This is the actual demo I did on Good Morning, Arizona. The "Minuet" bracelet wasn't my demo, but I had planned to say that I had the full instructions for creating it on my blog during the TV spot. I don't think I did... It all went by so fast and I tried to get the most important points in and I think I got them all.
Except for one...
Mainly that, especially in Arizona, when you buy polymer clay, give the corner of the block a squeeze to make sure it's still soft. The clay can actually get partially baked in a truck on the way to and waiting to get into the store. I actually try to avoid buying any clay in the summer. It can baked in your car on the way home, too! If I do manage to find some soft clay in summer, I buy it and immediately put the block(s) of clay into my purse for transporting home. My purses will usually stay pretty cool inside. Never, ever leave raw clay in your car. It will bake, but not enough to be truly done. Only enough to be completely unusable.
But you're really here for the tutorial. ^_~ Here are more detailed instructions for the demo I did on the news.
Pebble Pieces Tutorial
To make these pieces, you'll need some polymer clay, a rubber stamp, and a circle cutting tool. This can be as simple as cutting the bottom off of a straw. Cut it at a slight angle, then clip off any sharp point you made. This helps you remember which end is the flat end. Also, cut the straw slightly shorter than a toothpick so that you can use the toothpick to push the clay back out once you've cut.
Knead your clay pieces until they're soft and easy to work with. Roll them into a ball.
Squash the ball with the palm of your hand and then with the heel of your hand to create a nice, rounded pebble shape.
Rub over the surface of the clay with your fingers to smooth away any prints.
Stamp the clay to create texture.
Cut your hole(s) where desired with your straw piece.
Here's the cut hole and the toothpick pushing the clay back out of the straw. You can use this same straw over and over again, and the little piece of clay you push out can be used to make smaller charms using almost the exact same methods you used to make the big piece.
To accent with acrylic paint, use an old paint brush to pounce paint into all the recesses. (This is a different clay piece than the pieces shown above... it's a bracelet link rather than a pendant.)
Wipe off the excess clay and you're left with a beautifully accented piece for your jewelry. This is so incredibly simple, you'll feel like you cheated. ^_^
The finished bracelet I made with these simple pieces is so pretty... Tess (the news anchor) seemed most impressed with this one, and she held it up to show the camera.
This is honestly simple enough to do with your kids. Dad can sit with the kids and have them make presents for Mom for Mother's Day, for instance. The kids could make the initial pieces and Dad can do assembly. This entire bracelet was put together with nothing more than opening and closing jump rings. There was not a single bit of wire work in this piece, so if you can hold a couple of pliers and open and close a jump ring, you can make a bracelet like this one.
Here is a closeup shot of the little charm cluster at the end of the bracelet. You can see my tiny polymer clay charm. Basically, I rolled the tiny bit of clay pushed out of the straw into a ball, squashed it with my finger, then removed the prints, and stamped it. Then I picked it up, put it against my finger, and carefully poked through it with the toothpick to create the hole. It baked with the other pieces. You really can make these pieces as big or as small as you like. It's so fun and so easy, and, who knows? It could get you started in the world of polymer clay, which could keep you busy for a LONG time. ^_~
Almost 12 years of making jewelry, 8 years of playing with polymer clay, four published articles (Polymer Cafe), a photo (SpinOff), and two upcoming published projects (Cricut Magazine), four years of teaching paper crafting (where the Paper Sensei comes from), an awesome husband, two kids, a snake, and don't forget the knitting, crocheting, spinning... I don't have enough to do. ^_~
Monday, March 12, 2012
Sunday, March 11, 2012
"Minuet" Bracelet Tutorial, as seen on Good Morning, Arizona
This morning, I went on 3TV's Good Morning Arizona to demonstrate simple stamping and texturing techniques in polymer clay--so simple that even kids can do it!
However, I know that even though we like looking for projects to do with our kids, moms and dads also like something that they can do for themselves. That's why I've put this tutorial together. It's a much more complex application of the simple techniques, but that's the point. This shows you some of what is possible on a slightly larger scale. I'd love to see what you make from here!
This is definitely not a kids' project because it uses tissue blades (essentially 6 inch long razor blades). These are very handy tools, but obviously not for kids. You can do a similar project using different shaped cutters that are not actually sharp, such as biscuit or cookie cutters. Once a cutter is used for polymer clay, it shouldn't be used again for food.
"Minuet" Bracelet Tutorial
Supplies:
-Polymer clay in desired color (I used a light pink mix)
-Acrylic paint in desired color (I used Folk Art Burnt Umber)
-Jumprings, at least 8mm, approximately 18 gauge
-Smaller jumprings for attaching other charms, if desired
-Clasp (I'm using a slide lock clasp, but any kind of clasp will do)
-Charms, if desired
-Ribbon and ribbon clamps, if desired
Tools:
-Pasta machine for polymer clay, or acrylic roller
-Stamps in desired designs... I used a large music sheet texture stamp, small letter stamps, and tiny heart and tiny damask stamps from the Stampin' Up! Tiny Tags set
-Tissue blades
-Needle tool, for poking holes
-1/16" drill bit for finishing holes after baking, if necessary
-Hard bristle paintbrush or old tooth brush
-Paper towels
-Two pairs of jewelry pliers, either two pairs of chain nose or one pair of chain nose and one pair of flat nose
Instructions for each step are detailed beneath that step's photo.
Begin by conditioning your clay (roll and fold it through the pasta machine several times, or roll by hand... for more detailed instructions, please search online for one of the many thorough and detailed tutorials on clay conditioning), then roll it out on the thickest setting of your pasta machine, or about 1/8" thick. Stamp your image on the clay surface. If dissatisfied with the results, fold and roll the clay out flat again. Repeat the stamping until you're satisfied with how it looks.
You may want to make your bracelet pieces similar in size to your clasp. If so, use your clasp as a measuring guide for cutting your strips. (This isn't really necessary unless you're using a clasp similar to mine.) Cut the strips in the area you find most attractive. In my case, I wanted to include the double staff of the music strips. Cut the left side straight so that you can begin cutting your pieces.
I wanted my pieces to be smallish rectangles, so I cut the first piece to my desired size. (For a bracelet like this, depending on how loose it will be, you don't want pieces that are too wide. They won't move smoothly on the wrist.) If you want all of your pieces to be roughly the same size, use the first piece you cut as your template for each subsequent piece you cut. This way, you may have some variation, but because you always used the same initial piece as your template, you shouldn't go too far off. If, however, you choose to disregard this instruction (I know slightly rebellious artistic souls all too well... Don't ask me how.), you may find that you keep using the next piece cut as your template instead, and all of the pieces get slightly bigger and bigger until you're cutting pieces that are nowhere near the same size as the first piece you cut.
Sometimes you'll be able to get every piece you need from the first stamping, but other times you'll need to fold the clay up and roll it out again and re-stamp to get all of your pieces. If this happens, use that first piece you cut as your template again to do every cut for each subsequent strip you make, height and width. Not all the pieces will be perfectly the same since you are cutting them by hand, but the differences shouldn't be so pronounced that they cause a problem. Cut more than you think you need to make a bracelet. Line them up with a ruler to be sure. I made about 7.5" of pieces knowing that there would be extra space in the finished bracelet, so I knew I had enough.
For a little bit of added interest, I like to take the non-cutting end of my tissue blade and press gently just inside the edges all around the pieces. It gives them a little frame. Because this stamp was largely made of lines, though, I didn't put the extra border on all of the sides.
I like to frequently throw little details into my work--things that most people would probably never notice. In this bracelet, I decided to make the left most piece, or the start of the bracelet, with the beginning of the musical score, showing the artistic treble and bass clefs, the key signature, and the common time "c". So the start of the bracelet is the start of the song. I made the right most piece, or the end of the bracelet, with the double bar line, or the end of the song. I've played piano for most of my life, so this kind of detailing is almost compulsory to me. ^_~
If using a clasp similar to mine, with multiple holes, use the clasp itself as your template for poking starter holes. Once your starter holes are in place, go ahead and gently enlarge them by poking further with your needle tool or by whirling the tip of the tool around inside of the hole. Try to get it bigger than the diameter of your jump rings. The strongest holes are the ones made before pieces are baked.
You can eyeball the rest of the holes. Put four holes into one piece first, and then, just like you did with the cutting, use that initial piece as your template for poking the rest of the holes. Don't poke them too far in from the edge, but make sure to leave enough clay on the edges so that the holes don't just tear open when tugged. Basically, your jump rings need to be large enough to fit both pieces together when slipped through the holes. I did two holes in each of the regular pieces, but used three holes on the right and left pieces to fit my clasp.
Incidentally, if you happen to poke one of the pieces WAY off (like I did on the two pieces at the very bottom in the above picture), just poke another piece similarly on the opposite side and keep those two pieces together during baking and assembly. For example, if you messed up one piece when poking along the right side of the piece, take a second piece, line it up next to the first, and poke the left side of the second piece to match the right side of the first piece. That way, your wonky holes will match each other and no one will ever notice in the finished bracelet. Poke the outer edge of the second piece lined up with your initial template piece so that it can fit well with the rest of the bracelet pieces.
To create an extra decoration, layer other stamped images on top of your first stamped layer. Roll a sheet on the middle setting of your pasta machine (if it has 7 settings... if not, roll it on the fourth thickest setting), or about 1/16" thick. Stamp this clay with whatever you desire and cut the image(s) out.
Layer your cut images as desired onto the bracelet pieces. Bake the pieces in your polymer clay dedicated oven (or in your oven within an oven setup, which is essentially two aluminum pie plates stuck together, one inverted over the other, with clothespins or aluminum foil along the seams) at the recommended temperature for the recommended time.
When cool, accent your pieces as desired with acrylic paint. I chose burnt umber to give this an antiqued appearance. Using a hard bristle paint brush (pretty much the cheapest brush you can get your hands on), dab the paint onto the piece so that paint gets into all of the little crevices of the textured surface.
Get the piece completely covered, then quickly...!
Wipe off the paint with a paper towel before it dries and... viola! It's like blocking lace knitting, but so much faster. What a high. I don't think I ever get over seeing how cool the paint accented pieces look once they've got their paint on them. ^_^ This particular piece didn't look dark enough for me...
If that happens to you, simply cover the piece in paint again, and this time, when you wipe with the towel, wipe much more softly. You should leave more paint on the piece then. Repeat if necessary until you get the desired effect.
If the paint should dry on the surface and you hate the way it looks, quickly wash it off with water and a little soap if necessary. As long as it hasn't rested on the clay too long, it should be easy to wipe off.
Once you're satisfied with the way all of your pieces look, bake all of the pieces again at the recommended temperature for about 10-15 minutes. This bonds the paint to the surface of the clay so that only sanding or scratching with a sharp instrument will remove it.
When everything is baked and painted, it's time to assemble! Lay out the pieces next to a ruler, estimating about how long it will be, and arrange the pieces accordingly. You'll almost always be wrong about this estimate, by the way. But more on that later.
To assemble with jump rings, open your jump ring with your two pairs of pliers as shown. You open the ring with a slight twist rather than pulling them open by pulling the ring apart. This way they can be closed again securely while retaining their shape.
Join your pieces together like a book, as shown, starting at one end. (I always save the clasp for last.)
If you need more details, here they are... Slip one half of the jump ring from front to back in the left piece. (Reverse these instructions if you're left handed.)
Turn the whole thing upside down and arrange the second piece so that when viewed from the right side, the pieces are facing the same way. You'll still be looking at both pieces from the back. Put the second piece at a slight angle and slip it onto the jump ring as shown.
Allow the second piece to go along the jump ring until enough of the ring is exposed on both ends for you to get your pliers in there and close it up. Close it with another slight twist and you're good to go.
Work from the ends to the middle. Once you've gotten a few of the pieces established, go ahead and measure it again now that you know how much space is going to be between each piece. I had to take some of the pieces out to make it a good length. Aim for about 1/2" larger than your wrist for a close fitting bracelet, or up to an inch larger for a really loose bracelet.
Once all of the pieces are attached to one another, go ahead and attach the clasp to one end. When using a slide lock clasp like this, it's really easy to attach the clasp incorrectly on one side so that you have to take the entire thing apart and reattach it. Avoid this problem by leaving the clasp assembled. Simply form the complete bracelet and attach the first ring on the clasp to the first hole of the last piece as pictured. Once this is done, you can unhook the clasp and finish attaching it to the bracelet.
At this point, you've finished assembling your bracelet and you can be finished. It's really cute!
I made some extra clay charms when I made the bracelet. Basically, I stamped an image and then cut around it, leaving a roundish tab at the top center of the cut piece where I poked a hole before baking. To arrange extra charms on top of the bracelet, I just throw them around until I find the places I want them to be.
Attach the charms with jump rings, including little ribbon charms, if desired. To create ribbon charms, clamp a short, folded ribbon into a ribbon crimp and attach the crimp with a jump ring to your work.
However, I know that even though we like looking for projects to do with our kids, moms and dads also like something that they can do for themselves. That's why I've put this tutorial together. It's a much more complex application of the simple techniques, but that's the point. This shows you some of what is possible on a slightly larger scale. I'd love to see what you make from here!
This is definitely not a kids' project because it uses tissue blades (essentially 6 inch long razor blades). These are very handy tools, but obviously not for kids. You can do a similar project using different shaped cutters that are not actually sharp, such as biscuit or cookie cutters. Once a cutter is used for polymer clay, it shouldn't be used again for food.
"Minuet" Bracelet Tutorial
Supplies:
-Polymer clay in desired color (I used a light pink mix)
-Acrylic paint in desired color (I used Folk Art Burnt Umber)
-Jumprings, at least 8mm, approximately 18 gauge
-Smaller jumprings for attaching other charms, if desired
-Clasp (I'm using a slide lock clasp, but any kind of clasp will do)
-Charms, if desired
-Ribbon and ribbon clamps, if desired
Tools:
-Pasta machine for polymer clay, or acrylic roller
-Stamps in desired designs... I used a large music sheet texture stamp, small letter stamps, and tiny heart and tiny damask stamps from the Stampin' Up! Tiny Tags set
-Tissue blades
-Needle tool, for poking holes
-1/16" drill bit for finishing holes after baking, if necessary
-Hard bristle paintbrush or old tooth brush
-Paper towels
-Two pairs of jewelry pliers, either two pairs of chain nose or one pair of chain nose and one pair of flat nose
Instructions for each step are detailed beneath that step's photo.
Begin by conditioning your clay (roll and fold it through the pasta machine several times, or roll by hand... for more detailed instructions, please search online for one of the many thorough and detailed tutorials on clay conditioning), then roll it out on the thickest setting of your pasta machine, or about 1/8" thick. Stamp your image on the clay surface. If dissatisfied with the results, fold and roll the clay out flat again. Repeat the stamping until you're satisfied with how it looks.
You may want to make your bracelet pieces similar in size to your clasp. If so, use your clasp as a measuring guide for cutting your strips. (This isn't really necessary unless you're using a clasp similar to mine.) Cut the strips in the area you find most attractive. In my case, I wanted to include the double staff of the music strips. Cut the left side straight so that you can begin cutting your pieces.
I wanted my pieces to be smallish rectangles, so I cut the first piece to my desired size. (For a bracelet like this, depending on how loose it will be, you don't want pieces that are too wide. They won't move smoothly on the wrist.) If you want all of your pieces to be roughly the same size, use the first piece you cut as your template for each subsequent piece you cut. This way, you may have some variation, but because you always used the same initial piece as your template, you shouldn't go too far off. If, however, you choose to disregard this instruction (I know slightly rebellious artistic souls all too well... Don't ask me how.), you may find that you keep using the next piece cut as your template instead, and all of the pieces get slightly bigger and bigger until you're cutting pieces that are nowhere near the same size as the first piece you cut.
Sometimes you'll be able to get every piece you need from the first stamping, but other times you'll need to fold the clay up and roll it out again and re-stamp to get all of your pieces. If this happens, use that first piece you cut as your template again to do every cut for each subsequent strip you make, height and width. Not all the pieces will be perfectly the same since you are cutting them by hand, but the differences shouldn't be so pronounced that they cause a problem. Cut more than you think you need to make a bracelet. Line them up with a ruler to be sure. I made about 7.5" of pieces knowing that there would be extra space in the finished bracelet, so I knew I had enough.
For a little bit of added interest, I like to take the non-cutting end of my tissue blade and press gently just inside the edges all around the pieces. It gives them a little frame. Because this stamp was largely made of lines, though, I didn't put the extra border on all of the sides.
I like to frequently throw little details into my work--things that most people would probably never notice. In this bracelet, I decided to make the left most piece, or the start of the bracelet, with the beginning of the musical score, showing the artistic treble and bass clefs, the key signature, and the common time "c". So the start of the bracelet is the start of the song. I made the right most piece, or the end of the bracelet, with the double bar line, or the end of the song. I've played piano for most of my life, so this kind of detailing is almost compulsory to me. ^_~
If using a clasp similar to mine, with multiple holes, use the clasp itself as your template for poking starter holes. Once your starter holes are in place, go ahead and gently enlarge them by poking further with your needle tool or by whirling the tip of the tool around inside of the hole. Try to get it bigger than the diameter of your jump rings. The strongest holes are the ones made before pieces are baked.
You can eyeball the rest of the holes. Put four holes into one piece first, and then, just like you did with the cutting, use that initial piece as your template for poking the rest of the holes. Don't poke them too far in from the edge, but make sure to leave enough clay on the edges so that the holes don't just tear open when tugged. Basically, your jump rings need to be large enough to fit both pieces together when slipped through the holes. I did two holes in each of the regular pieces, but used three holes on the right and left pieces to fit my clasp.
Incidentally, if you happen to poke one of the pieces WAY off (like I did on the two pieces at the very bottom in the above picture), just poke another piece similarly on the opposite side and keep those two pieces together during baking and assembly. For example, if you messed up one piece when poking along the right side of the piece, take a second piece, line it up next to the first, and poke the left side of the second piece to match the right side of the first piece. That way, your wonky holes will match each other and no one will ever notice in the finished bracelet. Poke the outer edge of the second piece lined up with your initial template piece so that it can fit well with the rest of the bracelet pieces.
To create an extra decoration, layer other stamped images on top of your first stamped layer. Roll a sheet on the middle setting of your pasta machine (if it has 7 settings... if not, roll it on the fourth thickest setting), or about 1/16" thick. Stamp this clay with whatever you desire and cut the image(s) out.
Layer your cut images as desired onto the bracelet pieces. Bake the pieces in your polymer clay dedicated oven (or in your oven within an oven setup, which is essentially two aluminum pie plates stuck together, one inverted over the other, with clothespins or aluminum foil along the seams) at the recommended temperature for the recommended time.
When cool, accent your pieces as desired with acrylic paint. I chose burnt umber to give this an antiqued appearance. Using a hard bristle paint brush (pretty much the cheapest brush you can get your hands on), dab the paint onto the piece so that paint gets into all of the little crevices of the textured surface.
Get the piece completely covered, then quickly...!
Wipe off the paint with a paper towel before it dries and... viola! It's like blocking lace knitting, but so much faster. What a high. I don't think I ever get over seeing how cool the paint accented pieces look once they've got their paint on them. ^_^ This particular piece didn't look dark enough for me...
If that happens to you, simply cover the piece in paint again, and this time, when you wipe with the towel, wipe much more softly. You should leave more paint on the piece then. Repeat if necessary until you get the desired effect.
If the paint should dry on the surface and you hate the way it looks, quickly wash it off with water and a little soap if necessary. As long as it hasn't rested on the clay too long, it should be easy to wipe off.
Once you're satisfied with the way all of your pieces look, bake all of the pieces again at the recommended temperature for about 10-15 minutes. This bonds the paint to the surface of the clay so that only sanding or scratching with a sharp instrument will remove it.
When everything is baked and painted, it's time to assemble! Lay out the pieces next to a ruler, estimating about how long it will be, and arrange the pieces accordingly. You'll almost always be wrong about this estimate, by the way. But more on that later.
To assemble with jump rings, open your jump ring with your two pairs of pliers as shown. You open the ring with a slight twist rather than pulling them open by pulling the ring apart. This way they can be closed again securely while retaining their shape.
Join your pieces together like a book, as shown, starting at one end. (I always save the clasp for last.)
If you need more details, here they are... Slip one half of the jump ring from front to back in the left piece. (Reverse these instructions if you're left handed.)
Turn the whole thing upside down and arrange the second piece so that when viewed from the right side, the pieces are facing the same way. You'll still be looking at both pieces from the back. Put the second piece at a slight angle and slip it onto the jump ring as shown.
Allow the second piece to go along the jump ring until enough of the ring is exposed on both ends for you to get your pliers in there and close it up. Close it with another slight twist and you're good to go.
Work from the ends to the middle. Once you've gotten a few of the pieces established, go ahead and measure it again now that you know how much space is going to be between each piece. I had to take some of the pieces out to make it a good length. Aim for about 1/2" larger than your wrist for a close fitting bracelet, or up to an inch larger for a really loose bracelet.
Once all of the pieces are attached to one another, go ahead and attach the clasp to one end. When using a slide lock clasp like this, it's really easy to attach the clasp incorrectly on one side so that you have to take the entire thing apart and reattach it. Avoid this problem by leaving the clasp assembled. Simply form the complete bracelet and attach the first ring on the clasp to the first hole of the last piece as pictured. Once this is done, you can unhook the clasp and finish attaching it to the bracelet.
At this point, you've finished assembling your bracelet and you can be finished. It's really cute!
I made some extra clay charms when I made the bracelet. Basically, I stamped an image and then cut around it, leaving a roundish tab at the top center of the cut piece where I poked a hole before baking. To arrange extra charms on top of the bracelet, I just throw them around until I find the places I want them to be.
Attach the charms with jump rings, including little ribbon charms, if desired. To create ribbon charms, clamp a short, folded ribbon into a ribbon crimp and attach the crimp with a jump ring to your work.
Friday, March 9, 2012
TV Debut!
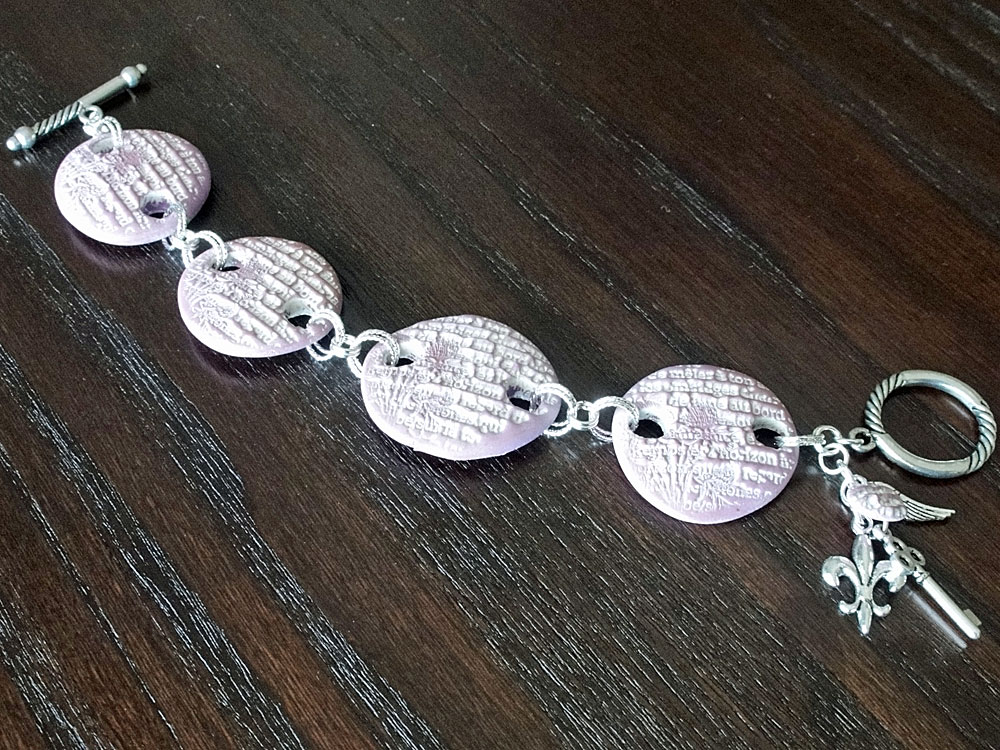
I'm going on TV on Sunday!!! I'll be on Good Morning, Arizona on channel 3 at about 7:40 or so in the morning. I'm doing a 4 minute craft spot on textured polymer clay pieces. One of the examples of what can be done with this totally simple technique is below...
Seriously, it's so easy. Most people who already do clay aren't going to learn anything new from what I'll be showing, but if you've never touched clay in your life, you'll be pleasantly surprised by how easy it is to do stuff like this. ^_^ On the show, I'll only be demonstrating the very basic techniques, but on Sunday morning, I'll post a full tutorial instructing you, step by step, on how to create a bracelet similar to this one.
I'm calling it my "Minuet" bracelet. ^_~ I'm quite in love with it. Obviously you wouldn't have to create something this complex with the techniques. This is more about showing you the possibilities. In my mind, at least, I think that showing a very complex project should make it easier to create something more simple, because a complex thing will naturally show more steps and answer more questions. This way you won't be lost if you DO decide you'd like to create something more complex... You'll already have the information.
I'm excited! See you on Sunday!
Seriously, it's so easy. Most people who already do clay aren't going to learn anything new from what I'll be showing, but if you've never touched clay in your life, you'll be pleasantly surprised by how easy it is to do stuff like this. ^_^ On the show, I'll only be demonstrating the very basic techniques, but on Sunday morning, I'll post a full tutorial instructing you, step by step, on how to create a bracelet similar to this one.
I'm calling it my "Minuet" bracelet. ^_~ I'm quite in love with it. Obviously you wouldn't have to create something this complex with the techniques. This is more about showing you the possibilities. In my mind, at least, I think that showing a very complex project should make it easier to create something more simple, because a complex thing will naturally show more steps and answer more questions. This way you won't be lost if you DO decide you'd like to create something more complex... You'll already have the information.
I'm excited! See you on Sunday!
Wednesday, March 7, 2012
Kat's Pendant
While at Tempe Yarn and Fiber in December, Kat handed me an envelope containing 12 little jewels. She knew I worked with polymer clay and wanted me to make her a pendant containing all of them. "Each one has its own story," she said in the card housing the jewels. "You're the artist. Just make something you think is beautiful."
Apparently she's held on to some of these for close to 40 years. I can't say how much trouble I had even starting this. Normally, with a special order, I have a tiny bit of apprehension, but something like this...
My inspiration was the history of the pieces, as well as their generally mismatched nature. I thought of archaic jewelry and how beautiful so much of it was with gems of every color, shape, and size all made into show stopping pieces for the ancient elite.
With this in mind, I tried to make something that looked like a timeworn and dearly loved keepsake. I hope I did justice to her little treasures.
Apparently she's held on to some of these for close to 40 years. I can't say how much trouble I had even starting this. Normally, with a special order, I have a tiny bit of apprehension, but something like this...
My inspiration was the history of the pieces, as well as their generally mismatched nature. I thought of archaic jewelry and how beautiful so much of it was with gems of every color, shape, and size all made into show stopping pieces for the ancient elite.
With this in mind, I tried to make something that looked like a timeworn and dearly loved keepsake. I hope I did justice to her little treasures.
Monday, January 30, 2012
Article #4 is officially a go!!!!!
I just submitted my proposal for my fourth magazine article and it was accepted! Woohoo!!!
That's pretty much it. ^_^
Friday, January 27, 2012
Hedgehog the first!
I finished my first Valentine hedgehog. This one is for my older son.
AhHhhhhHHHH!!!! I LOVE IT! It's the Huggable Hedgehog pattern which you can purchase on Ravelry, or if you live in the Phoenix area and you'd like to support an amazing local business, you could buy it at Tempe Yarn and Fiber.
Anyway, I freaked out just a bit because I thought I had gotten eyes that were too big. If you look at the eye placement of most other people's projects on Ravelry, you see that they're more above the nose. I knew that these eyes were too big to do that, but JoAnn was all out of the smaller ones. I texted my hubby and said, "I think I got eyes that are too big. I guess it's not too big a deal... if these don't work, I can go somewhere else and get smaller eyes. They're only $2."
He texted back, "Is it anime?" And I texted back, "Probably! LoL!" And I kind of forgot about it. When I got home, though, and I started trying to make this work, I took his funny comment to heart and suddenly thought of Hello Kitty and how her eyes are almost on a straight line with her nose. So I thought I'd give it a go. And I LOVE it!!! I'm so glad that JoAnn was out of smaller eyes and that my hubby is brilliant on a future-seeing-psychic scale.
My husband is also wonderful because he sat after this was finished for probably at least two hours, pulling all of those little tendrils out so that the hedgehog would be extra hairy after felting. If you don't use a fun fur type yarn, it's almost required that you pull all the little bits from the inside to the outside so that you have a more dramatic finished product. TOTALLY worth it, by the way. He actually found it relaxing. So he gets to do the next one, too. But even if he didn't, I'd be doing it because the results are so incredible.
At first, I thought a crochet hook would be easier, but it was actually much easier to use the tip of a dpn and just flick them out, rather than having to hook each one individually.
Also, after the guy was felted, I couldn't poke those eyes and nose through to save my life. I marked the spots where I wanted them to go with a black marker and then snipped a tiny hole (no wider than 3/16") on those spots very carefully with extremely sharp scissors. Basically aim to make the hole you snip just a little smaller than the width of the post of the eye/nose attachment you use. I used 15mm eyes and a 21mm nose.
Also, just in case any of you are unfamiliar with the process of felting, this is what the hedgehog looks like BEFORE you felt it. Everything felts faster, by the way, if you felt it (in a zippered pillowcase... that's not faster, it just saves your washing machine) with a pair of jeans in the cycle. Just so ya'll know.
Basic felting instructions (Kathy style) are as follows: set your machine to the hottest water, the smallest load size, and the longest wash cycle. Throw in just a touch of laundry detergent. (Some people leave this out, but I figure that you might as well wash it at the same time.) Zip up your piece into a zippered pillow case (or tie an overhand knot in the end of a normal pillow case, which is what I really do because I don't have a zippered pillow case, but I want to get one because untying a knot to check felting progress is a pain in the butt... but I do know that tying the corners together is not good enough because it always comes undone in the machine). Throw into the washing machine with a pair of jeans and run the cycle. After agitation begins, check the piece every 5 minutes. If it looks like it's almost done at one point when you pull it out, then put it back in and check after only 2 minutes. DON'T let the machine go through it's spin cycle (why you picked the longest wash cycle) because this can apparently create permanent creases. Rinse the item by hand, fold a towel over it and step on it a lot, like you're crushing grapes, to remove most of the moisture, and then temporarily stuff it until it's completely dry, to get the shape you want.
Boxes are great for purses. Use plastic bags for soft, round things like this. It usually takes 1-2 days to dry completely, or, if it's summer, leave it in your garage or outside if you're not afraid of animals (animals LOVE wool... it's weird) and it could seriously be completely dry in half a day.
Anyway, I wasn't intending to write this much, but then I never really do. I'm the Sensei.... I just kind of can't help myself. ^_~
AhHhhhhHHHH!!!! I LOVE IT! It's the Huggable Hedgehog pattern which you can purchase on Ravelry, or if you live in the Phoenix area and you'd like to support an amazing local business, you could buy it at Tempe Yarn and Fiber.
Anyway, I freaked out just a bit because I thought I had gotten eyes that were too big. If you look at the eye placement of most other people's projects on Ravelry, you see that they're more above the nose. I knew that these eyes were too big to do that, but JoAnn was all out of the smaller ones. I texted my hubby and said, "I think I got eyes that are too big. I guess it's not too big a deal... if these don't work, I can go somewhere else and get smaller eyes. They're only $2."
He texted back, "Is it anime?" And I texted back, "Probably! LoL!" And I kind of forgot about it. When I got home, though, and I started trying to make this work, I took his funny comment to heart and suddenly thought of Hello Kitty and how her eyes are almost on a straight line with her nose. So I thought I'd give it a go. And I LOVE it!!! I'm so glad that JoAnn was out of smaller eyes and that my hubby is brilliant on a future-seeing-psychic scale.
My husband is also wonderful because he sat after this was finished for probably at least two hours, pulling all of those little tendrils out so that the hedgehog would be extra hairy after felting. If you don't use a fun fur type yarn, it's almost required that you pull all the little bits from the inside to the outside so that you have a more dramatic finished product. TOTALLY worth it, by the way. He actually found it relaxing. So he gets to do the next one, too. But even if he didn't, I'd be doing it because the results are so incredible.
At first, I thought a crochet hook would be easier, but it was actually much easier to use the tip of a dpn and just flick them out, rather than having to hook each one individually.
Also, after the guy was felted, I couldn't poke those eyes and nose through to save my life. I marked the spots where I wanted them to go with a black marker and then snipped a tiny hole (no wider than 3/16") on those spots very carefully with extremely sharp scissors. Basically aim to make the hole you snip just a little smaller than the width of the post of the eye/nose attachment you use. I used 15mm eyes and a 21mm nose.
Also, just in case any of you are unfamiliar with the process of felting, this is what the hedgehog looks like BEFORE you felt it. Everything felts faster, by the way, if you felt it (in a zippered pillowcase... that's not faster, it just saves your washing machine) with a pair of jeans in the cycle. Just so ya'll know.
Basic felting instructions (Kathy style) are as follows: set your machine to the hottest water, the smallest load size, and the longest wash cycle. Throw in just a touch of laundry detergent. (Some people leave this out, but I figure that you might as well wash it at the same time.) Zip up your piece into a zippered pillow case (or tie an overhand knot in the end of a normal pillow case, which is what I really do because I don't have a zippered pillow case, but I want to get one because untying a knot to check felting progress is a pain in the butt... but I do know that tying the corners together is not good enough because it always comes undone in the machine). Throw into the washing machine with a pair of jeans and run the cycle. After agitation begins, check the piece every 5 minutes. If it looks like it's almost done at one point when you pull it out, then put it back in and check after only 2 minutes. DON'T let the machine go through it's spin cycle (why you picked the longest wash cycle) because this can apparently create permanent creases. Rinse the item by hand, fold a towel over it and step on it a lot, like you're crushing grapes, to remove most of the moisture, and then temporarily stuff it until it's completely dry, to get the shape you want.
Boxes are great for purses. Use plastic bags for soft, round things like this. It usually takes 1-2 days to dry completely, or, if it's summer, leave it in your garage or outside if you're not afraid of animals (animals LOVE wool... it's weird) and it could seriously be completely dry in half a day.
Anyway, I wasn't intending to write this much, but then I never really do. I'm the Sensei.... I just kind of can't help myself. ^_~
Tuesday, January 24, 2012
My Corner Studio
Lupe requested pics of our spaces to put in the AZPCG (Arizona Polymer Clay Guild) newsletter. She specifically requested pics of mine because it's small, I suppose. I feel like it's kind of huge, but then my space started off even smaller than this. I get a corner of our living room all to myself, and I have jokingly called it my corner studio. This thing has evolved slowly over the course of the last 8 years or so of my life. It's been built very organically, actually. I gradually spread out as I could to where I think are the limits.
My space is possibly unique amongst most creative spaces that get shown online because I'm going to show you the "for real" of it... It's totally low budget. I think I'm the fourth or fifth person to own my desk, for instance. I didn't have some designer come in and make my area. I have barely any purchased storage. Most of it was made by moi. If it wasn't, it's likely I purchased it at a garage sale. I am going to get really honest and transparent about my storage spaces, too. I'm posting this mainly hoping that I can potentially help someone else with their space, rather than with any wish to show mine off. (Not that there's anything wrong with showing off. I show off quite frequently. That's just not my intent today. ^_~)
Below is a shot of what my area usually looks like. The primary tip I have for using a smallish, multi-purpose space is to keep it clean. I'm pretty militant about cleaning up every single time I finish, unless I'm in some marathon session and I know I'll be making the same thing for quite a while. In any case, I also believe that I need to lead my family by example. If I expect them to clean their messes up, then I expect the same thing of myself. (My younger son usually sits and plays in that empty spot on my coffee table and I let him because I think it's cute.)
Here's another shot of the area, not including my coffee table setup. One of the other tips I have is kind of obvious, I guess, and overstated, but still... Go vertical. If you don't have a lot of space, you can usually build up. Don't forget to build down, too. I use the space underneath this little table to store a few things I don't usually need to get to, as well as a little gift bag that I frequently fill with things I no longer want/need. I let my crafty friends look through the bag when they come to my house so that they can take stuff home with them if they like it.
These stackable plastic drawers are pretty neat. There are three sets here. I started with only 1 (about $12 for a three drawer storage unit at Walmart) and eventually bought the other two as I expanded. They are a perfect size for storing scrapbook papers. I also store my purchased papers in kits. A 2 gallon Ziploc bag is perfect for storing 12x12 scrapbook papers. I put each separate paper pack and all of the stickers/accessories that go with it into the bag, then store them flat in the drawers marked "paper".
I picked up this rotating thingie at a garage sale for $4. Previously, I stored all of my items in a storage container I made from an old tin and toilet paper rolls. I covered the rolls in paper and stood them up in the tin to separate my pens and pencils and whatnot. Invariably, there were little spaces between the lip of the tin and the curved edges of the rolls, and those were the spots I'd stick my scissors and bone folders and other tools into. That little cheap organizer served me for a LONG time before I finally found this beauty.
I basically played Tetris with this thing for months before I got it exactly the way I love it now. It was just experience... I realized which things I used constantly and which things I didn't really need at hand and I cycled things in and out as I worked. That's another tip, I suppose... It's all a process. I don't think you can perfect your space overnight, and you certainly can't perfect it just by buying a bunch of expensive stuff and then suddenly hoping it will be organized. You've got to do it as you go, as you learn about yourself and about your art and what you use and what you need. Just because everyone else needs this tool right by them, for instance, doesn't mean that you need it, especially if you never use it. You'd be surprised at just how much your own preconceptions and other people's opinions about art and life can influence your space in ways that make it less useful to you. You've got to learn to listen to your own process to make it work for you.
Up on my shelves, I have all of my glorious Stampin' Up! stamps. I'm officially out of room, too, so I'm going to start rotating the ones I don't use as much out as I buy new sets. The ink storage was handmade. It's basically a divided box that has sections big enough for the ink pads which I store upside down.
I use my big stamps quite frequently to create texture in clay and to create my own background papers for paper crafting. So I didn't have to keep guessing, I cut pieces of paper that would fit on the outside and then stamped the paper with the stamp. I glued the piece to the end of each stamp. They're arranged biggest to littlest in a stack.
I also cut a piece of cardstock that fits under the rubber of the biggest stamp so that I can slide the stack in and out as I work. I had done a piece for each stamp, but it was too much of a pain to put back in place. I like to work mostly sitting down. Pretty much everything I need most frequently is in reach. I discovered that it was just easier to slide the entire stack out, use the ones I wanted, then slide it all back once the stamps were cleaned and dried.
This shot shows my other homemade inkpad storage. As you can see, over time the little "shelves" of the divided box have curved to the impression of the pads, but it still works beautifully. So that I could easily tell which color was which, I stamped a little paper with a design and then cut out a bit and inked the edges with the same pad before attaching the piece to the side of the ink pad.
This shot also shows my use of the shelf space behind the two pretty jars in front. I use so many recycled containers to hold my stuff. Spice jars, and, my favorite, the strawberry jelly jar in front. I use these to hold buttons and various other trinkets.
Here's a shot of my top shelf. I used old container candle glasses after the candle burned all the way down. You just pour the wax out while it's all liquid. To get extra finicky, just stand the glasses in a pan of simmering water until the wax gets all liquid inside, too, and then wipe them out with a paper towel. The two on either end actually had metal wick holder glued into them with some kind of crazy glue that NOTHING has removed. I was going to just throw them away in utter despair (^_~) before I realized that I'm storing buttons in them and the buttons will cover up that metal bit. Guess what? They do.
You can see some more of my homemade storage here. The red box up top is a cardstock box with ribbon handles glued into the sides and across the bottom. The storage boxes you see are homemade. I made my little ribbon tower (you can see a link over to the right about how to make your own homemade ribbon tower storage) vertical like this because I don't have space to have a big horizontal bar somewhere. I also try to keep just my spectrum stocked in kind of plain ribbon because, seriously, no one needs 72 spools of ribbon. I'm not criticizing. It's just kind of true, right? How do you use it all? Is your finished art really so effected by whether or not your ribbon has dots/ruffles/etc.? Every now and then I DO purchase a cute, fancy ribbon, but only if it fits in the tower. I could make myself another tower, but I don't have room. Anyway, this is all to say that you need to make decisions when you have a smallish area, and a severe limit to ribbon was one of those calls I had to make for myself.
I store random 3D embellishments in this little white box that was part of the packaging of my Nook.
I like this cute white storage thing I got, too. It was $3 at a garage sale and it had these horrifying wicker baskets in each hole that took up so much room. I pulled them out, cleaned the entire thing up, sanded all of the edges so that it was worn evenly, lined the back with some of my favorite papers, and turned it into storage without the baskets.
Over on my wall I hung up some decorated binder clips just slightly more than 6 inches apart. I can clip a single page in the middle or two on each end and have it look balanced. Or I can have a marathon scrapping session and hang a ton of pages up like I did recently. I like to hang them for at least a day to make sure all of the glue is dry and whatnot. I also think it's fun to have the pages displayed for a while before shoving them into an album on my shelf.
I store my non-kit paper scraps in a binder with 8.5x11" page protectors. (The scraps that go with a certain collection just stay with the collection in the 2 gallon Ziploc bags.) If your scrap is too big to fit into one of these page protectors then it can probably just go back onto the shelf. 12" scraps are easy to store... Just let them stick out of the top. I have it organized by color, with two protectors for each color... Plain paper/cardstock first, then patterned. Don't agonize over this too much. Whatever your very first impression of the patterned paper is, file it in that folder. I periodically go through this folder and recycle a bunch of the scraps, too. I also make sure to look here first when I'm looking for a specific color so that I can make my modest paper supply last longer.
Oh, clear stamps... how do I love thee? Let me count the ways...
I've written a lot about how clear stamps are actually awesome and DON'T give blotchy images if you use pigment or chalk ink with them. And how you can appreciate the blotchy image you get with dye ink if you call it "vintage" or "distressed". I adore clear stamps. They're easy to clean and easy to store. And in a limited space, this storage glory is key. It turns out that an 8.5x11" page protector is the PERFECT size for two sets of most of the clear stamps you can buy in JoAnn or Michael's. Manufacturers have to get cute, though, and make weird, non standard sizes. So Paper Sensei has a solution for that, too.
Lay your stamp sets down on a page protector and draw sharpie lines around them. Leave plenty of room. If you have stamp sets going in the bottom of the page protector, then draw a line over the top of each stamp set plus about 1/4". Slip a piece of cardstock into the page protector and cut the line with an X-Acto knife, being careful to only go through the protector and not through the cardstock to the other side.
Remove the cardstock from the page protector. Sew up the lines you originally drew with your sewing machine. So easy! Now you can slip your stamps into the spaces up top and slide your other stamps through the slits you made and into their holes. These things hold up over time, too. I have some that I know are at least 3 years old and they still work perfectly.
Here are shots of my drawers now. I store most of my pens flat to keep them from drying out. (Apparently this is a concern... I don't know for sure. I'd just rather be safe than sorry.) My alcohol inks and some spare clay blocks are stored in some more handmade storage, another divided cardstock box. I pretty much just try to keep the stuff I use the most on hand and easily accessible. I will sometimes pick a spool of ribbon to use up (you will actually use your stuff if you decide to use it up, and that keeps your space from getting overcrowded and gives you something to buy next time you go to the store) and throw it in here and try to use it on practically every project.
I also purposefully don't fill my drawers all the way if I can help it. This combined with using up my stuff means that I always feel like I've got wiggle room even if I never intend to use it.
The drawers are really a big Tetris game, too. I try to keep stuff in trays and boxes. The three cardstock boxes you see there are more homemade storage. They were made specifically to fit the things they hold, so that helps take up less space, too. Rather than buying bulky bins for everything, I tailor make much of my storage.
I store my embossing powders in some jewelry storage, too, to save space because the bottles are all different sizes. This way I can keep them all neat and use the little embossing powder bottles for other things. I can recycle them or use them as packaging for tiny gifts of little things like buttons, charms, etc, which I put together quite frequently for my crafty friends. (Giving stuff out of my stash, usually, which they love and I love because they get cute stuff and I free up more space.)
The tiny bits of jewelry storage are perfect for brads and such. I sort them out, especially if they come in a package that is all mixed colors. Don't look at me like that.
Anyway, I try to just stick to neutrals with the brads and the eyelets. Sure, other colors are cute, but this is another one of those decisions I've made so that I can save space.
Another tip: If you run out of silver brads or eyelets, just sand the tops off of some of your colored pieces. Virtually every one of them is silver underneath. You can also color these with alcohol inks if you'd like a brighter color that you don't have because you don't buy bright colors. ^_~
The final drawer is my exception to the "don't make the drawers too full" rule. But this one works for what it works for. I made homemade storage for my Cricut Solutions cartridges, too. There are little cardstock bars in there that hold all of the cartridges in place while all of the keyboards and booklets sit in the bottom of the box. I store all of the extra cords for my devices (and other things) in that clear shoe box bin so that I always know where they are.
Here's the coffee table where I store my Imagine, Imagine cartridges, and my filing cabinet, which is that wicker thing. I store all of my craft ideas, knitting patterns, yearly receipts, and other such things here. You can see here, too, that I use the space under the table to hold various things. Storing things in a tray on the floor is handy because I can just pull the entire tray out, grab what I need, then push the tray back. It keeps everything much neater. I also store my Kates here for my spinning.
Here's another shot that shows the other end of my corner studio... My polymer clay stuff and tools are all stored in the black pull case, and my clay oven is on top of the case. This fits perfectly, but there was a bit of Tetris involved here, too. It's evolved over time, so everything is right where I want it.
Okay, here's the part that horrifies me. I can't believe I'm showing this. But here is the area where I store all of my beads and jewelry tools. It's separate from my studio area, but still in the living room. These were built in cabinets. The boxes up top actually are very neatly organized with old baby food containers lined up inside of them, filled with various bits. They make the boxes stack quite neatly. I used to have ALL of my jewelry storage set up like this, in these boxes. But eventually I was running out of room and needed storage with smaller containers, so I finally purchased storage for my beads.
My primary recommendation here is to not go anywhere NEAR bead storage that is just a divided box with a lid that snaps shut on top of it. I still have nightmares (not really, but you know what I mean) about just how many times I have dropped, dumped, or hit one of these containers while it was open and sent my entire collection flying... Every single bit of my storage was required to be separate containers within another container. Yes, I sort out my brads after I buy them, but I'm not completely crazy. I only want to do it once.
You can actually still see some of the cute little stackable baby food containers in this shot. Funny! Those things are so old. They're Gerber, by the way, in case anyone with babies out there wants cute stackable storage for their craft area.
Here is my tool shelf which actually slides out. This is the coolest thing! Anyway... I'm able to keep it semi-messy because it slides out. But actually, everything is here even though it doesn't all fit because this is ALL of the stuff that I am constantly using. Buy a button from me at TYF and, seriously, practically all of this stuff was used in making that little thing you enjoy.
Ack! This is really the full Monty, isn't it? Anyway, here's my other cabinet. So while I have a smallish space, I actually do have quite a lot of storage space. But I like to think I use it effectively. Except for those top two shelves... I have a vague idea of what's up there. It's the one area I'm not entirely clear on. If I ever need that space, I'll go through it, I'm sure. ^_^
One last thing... I can't show off my yarn storage because we're rearranging the living room right now and there's stuff in front of my yarn shelf. (The yarn you've seen in previous pics is a collection of my handspun yarn, including one skein that isn't my handspun, and is in fact my genius friend, Kim's, handspun... it's kind of in the middle. The lightish one that has a lot of glorious colors. I had to have it, so I bought it.) But I'll show where I store my scraps and leftover balls of yarn...
Cute, huh?! I was at Yumiko Alexander's house for a spin-in and saw a huge fish tank she has which she uses to store gobs and gobs of yarn. It's so neatly organized, too, because she's a designer with Universal Yarns and they send her yarn to work with. Anyway, it kind of inspired me, and I remembered that I had this huge hurricane candle thing that was left in our house by the previous residents and I grabbed it and started filling it with my scraps. I love the sight of yarn in the glass like this. Don't know why. It just speaks to something inside of me.
Anyway, I can't believe I've written a post this long. I have things to do! ^_~ I hope it helped someone.
My space is possibly unique amongst most creative spaces that get shown online because I'm going to show you the "for real" of it... It's totally low budget. I think I'm the fourth or fifth person to own my desk, for instance. I didn't have some designer come in and make my area. I have barely any purchased storage. Most of it was made by moi. If it wasn't, it's likely I purchased it at a garage sale. I am going to get really honest and transparent about my storage spaces, too. I'm posting this mainly hoping that I can potentially help someone else with their space, rather than with any wish to show mine off. (Not that there's anything wrong with showing off. I show off quite frequently. That's just not my intent today. ^_~)
Below is a shot of what my area usually looks like. The primary tip I have for using a smallish, multi-purpose space is to keep it clean. I'm pretty militant about cleaning up every single time I finish, unless I'm in some marathon session and I know I'll be making the same thing for quite a while. In any case, I also believe that I need to lead my family by example. If I expect them to clean their messes up, then I expect the same thing of myself. (My younger son usually sits and plays in that empty spot on my coffee table and I let him because I think it's cute.)
Here's another shot of the area, not including my coffee table setup. One of the other tips I have is kind of obvious, I guess, and overstated, but still... Go vertical. If you don't have a lot of space, you can usually build up. Don't forget to build down, too. I use the space underneath this little table to store a few things I don't usually need to get to, as well as a little gift bag that I frequently fill with things I no longer want/need. I let my crafty friends look through the bag when they come to my house so that they can take stuff home with them if they like it.
These stackable plastic drawers are pretty neat. There are three sets here. I started with only 1 (about $12 for a three drawer storage unit at Walmart) and eventually bought the other two as I expanded. They are a perfect size for storing scrapbook papers. I also store my purchased papers in kits. A 2 gallon Ziploc bag is perfect for storing 12x12 scrapbook papers. I put each separate paper pack and all of the stickers/accessories that go with it into the bag, then store them flat in the drawers marked "paper".
I picked up this rotating thingie at a garage sale for $4. Previously, I stored all of my items in a storage container I made from an old tin and toilet paper rolls. I covered the rolls in paper and stood them up in the tin to separate my pens and pencils and whatnot. Invariably, there were little spaces between the lip of the tin and the curved edges of the rolls, and those were the spots I'd stick my scissors and bone folders and other tools into. That little cheap organizer served me for a LONG time before I finally found this beauty.
I basically played Tetris with this thing for months before I got it exactly the way I love it now. It was just experience... I realized which things I used constantly and which things I didn't really need at hand and I cycled things in and out as I worked. That's another tip, I suppose... It's all a process. I don't think you can perfect your space overnight, and you certainly can't perfect it just by buying a bunch of expensive stuff and then suddenly hoping it will be organized. You've got to do it as you go, as you learn about yourself and about your art and what you use and what you need. Just because everyone else needs this tool right by them, for instance, doesn't mean that you need it, especially if you never use it. You'd be surprised at just how much your own preconceptions and other people's opinions about art and life can influence your space in ways that make it less useful to you. You've got to learn to listen to your own process to make it work for you.
Up on my shelves, I have all of my glorious Stampin' Up! stamps. I'm officially out of room, too, so I'm going to start rotating the ones I don't use as much out as I buy new sets. The ink storage was handmade. It's basically a divided box that has sections big enough for the ink pads which I store upside down.
I use my big stamps quite frequently to create texture in clay and to create my own background papers for paper crafting. So I didn't have to keep guessing, I cut pieces of paper that would fit on the outside and then stamped the paper with the stamp. I glued the piece to the end of each stamp. They're arranged biggest to littlest in a stack.
I also cut a piece of cardstock that fits under the rubber of the biggest stamp so that I can slide the stack in and out as I work. I had done a piece for each stamp, but it was too much of a pain to put back in place. I like to work mostly sitting down. Pretty much everything I need most frequently is in reach. I discovered that it was just easier to slide the entire stack out, use the ones I wanted, then slide it all back once the stamps were cleaned and dried.
This shot shows my other homemade inkpad storage. As you can see, over time the little "shelves" of the divided box have curved to the impression of the pads, but it still works beautifully. So that I could easily tell which color was which, I stamped a little paper with a design and then cut out a bit and inked the edges with the same pad before attaching the piece to the side of the ink pad.
This shot also shows my use of the shelf space behind the two pretty jars in front. I use so many recycled containers to hold my stuff. Spice jars, and, my favorite, the strawberry jelly jar in front. I use these to hold buttons and various other trinkets.
Here's a shot of my top shelf. I used old container candle glasses after the candle burned all the way down. You just pour the wax out while it's all liquid. To get extra finicky, just stand the glasses in a pan of simmering water until the wax gets all liquid inside, too, and then wipe them out with a paper towel. The two on either end actually had metal wick holder glued into them with some kind of crazy glue that NOTHING has removed. I was going to just throw them away in utter despair (^_~) before I realized that I'm storing buttons in them and the buttons will cover up that metal bit. Guess what? They do.
You can see some more of my homemade storage here. The red box up top is a cardstock box with ribbon handles glued into the sides and across the bottom. The storage boxes you see are homemade. I made my little ribbon tower (you can see a link over to the right about how to make your own homemade ribbon tower storage) vertical like this because I don't have space to have a big horizontal bar somewhere. I also try to keep just my spectrum stocked in kind of plain ribbon because, seriously, no one needs 72 spools of ribbon. I'm not criticizing. It's just kind of true, right? How do you use it all? Is your finished art really so effected by whether or not your ribbon has dots/ruffles/etc.? Every now and then I DO purchase a cute, fancy ribbon, but only if it fits in the tower. I could make myself another tower, but I don't have room. Anyway, this is all to say that you need to make decisions when you have a smallish area, and a severe limit to ribbon was one of those calls I had to make for myself.
I store random 3D embellishments in this little white box that was part of the packaging of my Nook.
I like this cute white storage thing I got, too. It was $3 at a garage sale and it had these horrifying wicker baskets in each hole that took up so much room. I pulled them out, cleaned the entire thing up, sanded all of the edges so that it was worn evenly, lined the back with some of my favorite papers, and turned it into storage without the baskets.
Over on my wall I hung up some decorated binder clips just slightly more than 6 inches apart. I can clip a single page in the middle or two on each end and have it look balanced. Or I can have a marathon scrapping session and hang a ton of pages up like I did recently. I like to hang them for at least a day to make sure all of the glue is dry and whatnot. I also think it's fun to have the pages displayed for a while before shoving them into an album on my shelf.
I store my non-kit paper scraps in a binder with 8.5x11" page protectors. (The scraps that go with a certain collection just stay with the collection in the 2 gallon Ziploc bags.) If your scrap is too big to fit into one of these page protectors then it can probably just go back onto the shelf. 12" scraps are easy to store... Just let them stick out of the top. I have it organized by color, with two protectors for each color... Plain paper/cardstock first, then patterned. Don't agonize over this too much. Whatever your very first impression of the patterned paper is, file it in that folder. I periodically go through this folder and recycle a bunch of the scraps, too. I also make sure to look here first when I'm looking for a specific color so that I can make my modest paper supply last longer.
Oh, clear stamps... how do I love thee? Let me count the ways...
I've written a lot about how clear stamps are actually awesome and DON'T give blotchy images if you use pigment or chalk ink with them. And how you can appreciate the blotchy image you get with dye ink if you call it "vintage" or "distressed". I adore clear stamps. They're easy to clean and easy to store. And in a limited space, this storage glory is key. It turns out that an 8.5x11" page protector is the PERFECT size for two sets of most of the clear stamps you can buy in JoAnn or Michael's. Manufacturers have to get cute, though, and make weird, non standard sizes. So Paper Sensei has a solution for that, too.
Lay your stamp sets down on a page protector and draw sharpie lines around them. Leave plenty of room. If you have stamp sets going in the bottom of the page protector, then draw a line over the top of each stamp set plus about 1/4". Slip a piece of cardstock into the page protector and cut the line with an X-Acto knife, being careful to only go through the protector and not through the cardstock to the other side.
Remove the cardstock from the page protector. Sew up the lines you originally drew with your sewing machine. So easy! Now you can slip your stamps into the spaces up top and slide your other stamps through the slits you made and into their holes. These things hold up over time, too. I have some that I know are at least 3 years old and they still work perfectly.
Here are shots of my drawers now. I store most of my pens flat to keep them from drying out. (Apparently this is a concern... I don't know for sure. I'd just rather be safe than sorry.) My alcohol inks and some spare clay blocks are stored in some more handmade storage, another divided cardstock box. I pretty much just try to keep the stuff I use the most on hand and easily accessible. I will sometimes pick a spool of ribbon to use up (you will actually use your stuff if you decide to use it up, and that keeps your space from getting overcrowded and gives you something to buy next time you go to the store) and throw it in here and try to use it on practically every project.
I also purposefully don't fill my drawers all the way if I can help it. This combined with using up my stuff means that I always feel like I've got wiggle room even if I never intend to use it.
The drawers are really a big Tetris game, too. I try to keep stuff in trays and boxes. The three cardstock boxes you see there are more homemade storage. They were made specifically to fit the things they hold, so that helps take up less space, too. Rather than buying bulky bins for everything, I tailor make much of my storage.
I store my embossing powders in some jewelry storage, too, to save space because the bottles are all different sizes. This way I can keep them all neat and use the little embossing powder bottles for other things. I can recycle them or use them as packaging for tiny gifts of little things like buttons, charms, etc, which I put together quite frequently for my crafty friends. (Giving stuff out of my stash, usually, which they love and I love because they get cute stuff and I free up more space.)
The tiny bits of jewelry storage are perfect for brads and such. I sort them out, especially if they come in a package that is all mixed colors. Don't look at me like that.
Anyway, I try to just stick to neutrals with the brads and the eyelets. Sure, other colors are cute, but this is another one of those decisions I've made so that I can save space.
Another tip: If you run out of silver brads or eyelets, just sand the tops off of some of your colored pieces. Virtually every one of them is silver underneath. You can also color these with alcohol inks if you'd like a brighter color that you don't have because you don't buy bright colors. ^_~
The final drawer is my exception to the "don't make the drawers too full" rule. But this one works for what it works for. I made homemade storage for my Cricut Solutions cartridges, too. There are little cardstock bars in there that hold all of the cartridges in place while all of the keyboards and booklets sit in the bottom of the box. I store all of the extra cords for my devices (and other things) in that clear shoe box bin so that I always know where they are.
Here's the coffee table where I store my Imagine, Imagine cartridges, and my filing cabinet, which is that wicker thing. I store all of my craft ideas, knitting patterns, yearly receipts, and other such things here. You can see here, too, that I use the space under the table to hold various things. Storing things in a tray on the floor is handy because I can just pull the entire tray out, grab what I need, then push the tray back. It keeps everything much neater. I also store my Kates here for my spinning.
Here's another shot that shows the other end of my corner studio... My polymer clay stuff and tools are all stored in the black pull case, and my clay oven is on top of the case. This fits perfectly, but there was a bit of Tetris involved here, too. It's evolved over time, so everything is right where I want it.
Okay, here's the part that horrifies me. I can't believe I'm showing this. But here is the area where I store all of my beads and jewelry tools. It's separate from my studio area, but still in the living room. These were built in cabinets. The boxes up top actually are very neatly organized with old baby food containers lined up inside of them, filled with various bits. They make the boxes stack quite neatly. I used to have ALL of my jewelry storage set up like this, in these boxes. But eventually I was running out of room and needed storage with smaller containers, so I finally purchased storage for my beads.
My primary recommendation here is to not go anywhere NEAR bead storage that is just a divided box with a lid that snaps shut on top of it. I still have nightmares (not really, but you know what I mean) about just how many times I have dropped, dumped, or hit one of these containers while it was open and sent my entire collection flying... Every single bit of my storage was required to be separate containers within another container. Yes, I sort out my brads after I buy them, but I'm not completely crazy. I only want to do it once.
You can actually still see some of the cute little stackable baby food containers in this shot. Funny! Those things are so old. They're Gerber, by the way, in case anyone with babies out there wants cute stackable storage for their craft area.
Here is my tool shelf which actually slides out. This is the coolest thing! Anyway... I'm able to keep it semi-messy because it slides out. But actually, everything is here even though it doesn't all fit because this is ALL of the stuff that I am constantly using. Buy a button from me at TYF and, seriously, practically all of this stuff was used in making that little thing you enjoy.
Ack! This is really the full Monty, isn't it? Anyway, here's my other cabinet. So while I have a smallish space, I actually do have quite a lot of storage space. But I like to think I use it effectively. Except for those top two shelves... I have a vague idea of what's up there. It's the one area I'm not entirely clear on. If I ever need that space, I'll go through it, I'm sure. ^_^
One last thing... I can't show off my yarn storage because we're rearranging the living room right now and there's stuff in front of my yarn shelf. (The yarn you've seen in previous pics is a collection of my handspun yarn, including one skein that isn't my handspun, and is in fact my genius friend, Kim's, handspun... it's kind of in the middle. The lightish one that has a lot of glorious colors. I had to have it, so I bought it.) But I'll show where I store my scraps and leftover balls of yarn...
Cute, huh?! I was at Yumiko Alexander's house for a spin-in and saw a huge fish tank she has which she uses to store gobs and gobs of yarn. It's so neatly organized, too, because she's a designer with Universal Yarns and they send her yarn to work with. Anyway, it kind of inspired me, and I remembered that I had this huge hurricane candle thing that was left in our house by the previous residents and I grabbed it and started filling it with my scraps. I love the sight of yarn in the glass like this. Don't know why. It just speaks to something inside of me.
Anyway, I can't believe I've written a post this long. I have things to do! ^_~ I hope it helped someone.
Subscribe to:
Posts (Atom)